Tuesday, June 28, 2011

Saturday Sketch Challenge 209

Thought this was a perfect card to thank our crossing guard at school...


Based on this sketch...


Whisper White, Real Red, Pear Pizazz and Pacific Point Cardstocks, DSP from Paper Stack, Celebrations and Playdate, 2 retired ribbons and Whisper White and Real Red inks. Also, the Thanks from the Sale-a-Bration set (I can't remember what it's called right now ;)

Sunday, June 26, 2011

JAI73 Sketch Challenge

I found a new sketch blog that I'm in love with at Just Add Ink and thought this sketch would be PERFECT for making a coordinating card for the notebook I made earlier...


To see what I did/used for this card, just check out the post with my notebook a few posts down from this ;) It's all there!

Saturday, June 25, 2011

Triple Challenge card!

This is just a fun card, based on a Sketch Challenge TESC141, a color challenge cQc#90, and Amber's Crafts and Stuff theme challenge to make a SUMMER card...


I just have to say... I LOVE watercoloring, and mixing all my favorite Stampin' Up! mediums... Watercolor Pencils, Watercolor Crayons, Markers, Pastels and Ink pads, with Aqua Brushes and Blender Pens... it's one of the quickest and easiest ways to make images really stand out.


Friday, June 24, 2011

Another notebook and CPS223 challenge

I was originally going to practice my new idea on this small softcover notebook, before doing the one for Wyatt's teacher, but I was so inspired by the big one, I skipped the practice ;) So, here's what I did with this one today. I'm going to keep this one for myself, and use it to keep track of ideas I have, techniques I want to try, and other creative notes.


I used this sketch...
and I think this is a pretty simple, self-explanatory design...

I had to keep it flat and functional, of course, but I did throw in some brads, some heat embossing on the deer, with pastels in the embossing powder for texture and shading, and some random ribbons on the coil. Other than that, it's basically all Playdate DSP and sticker, with Funky Forest stamps and roller. Too bad I had already covered the original cover in Whisper White, with a completely different idea in mind, because Very Vanilla is what I used for the bases on the layout... oh well!

Thursday, June 23, 2011

Thank You gift for Teacher and SUO Challenge 21

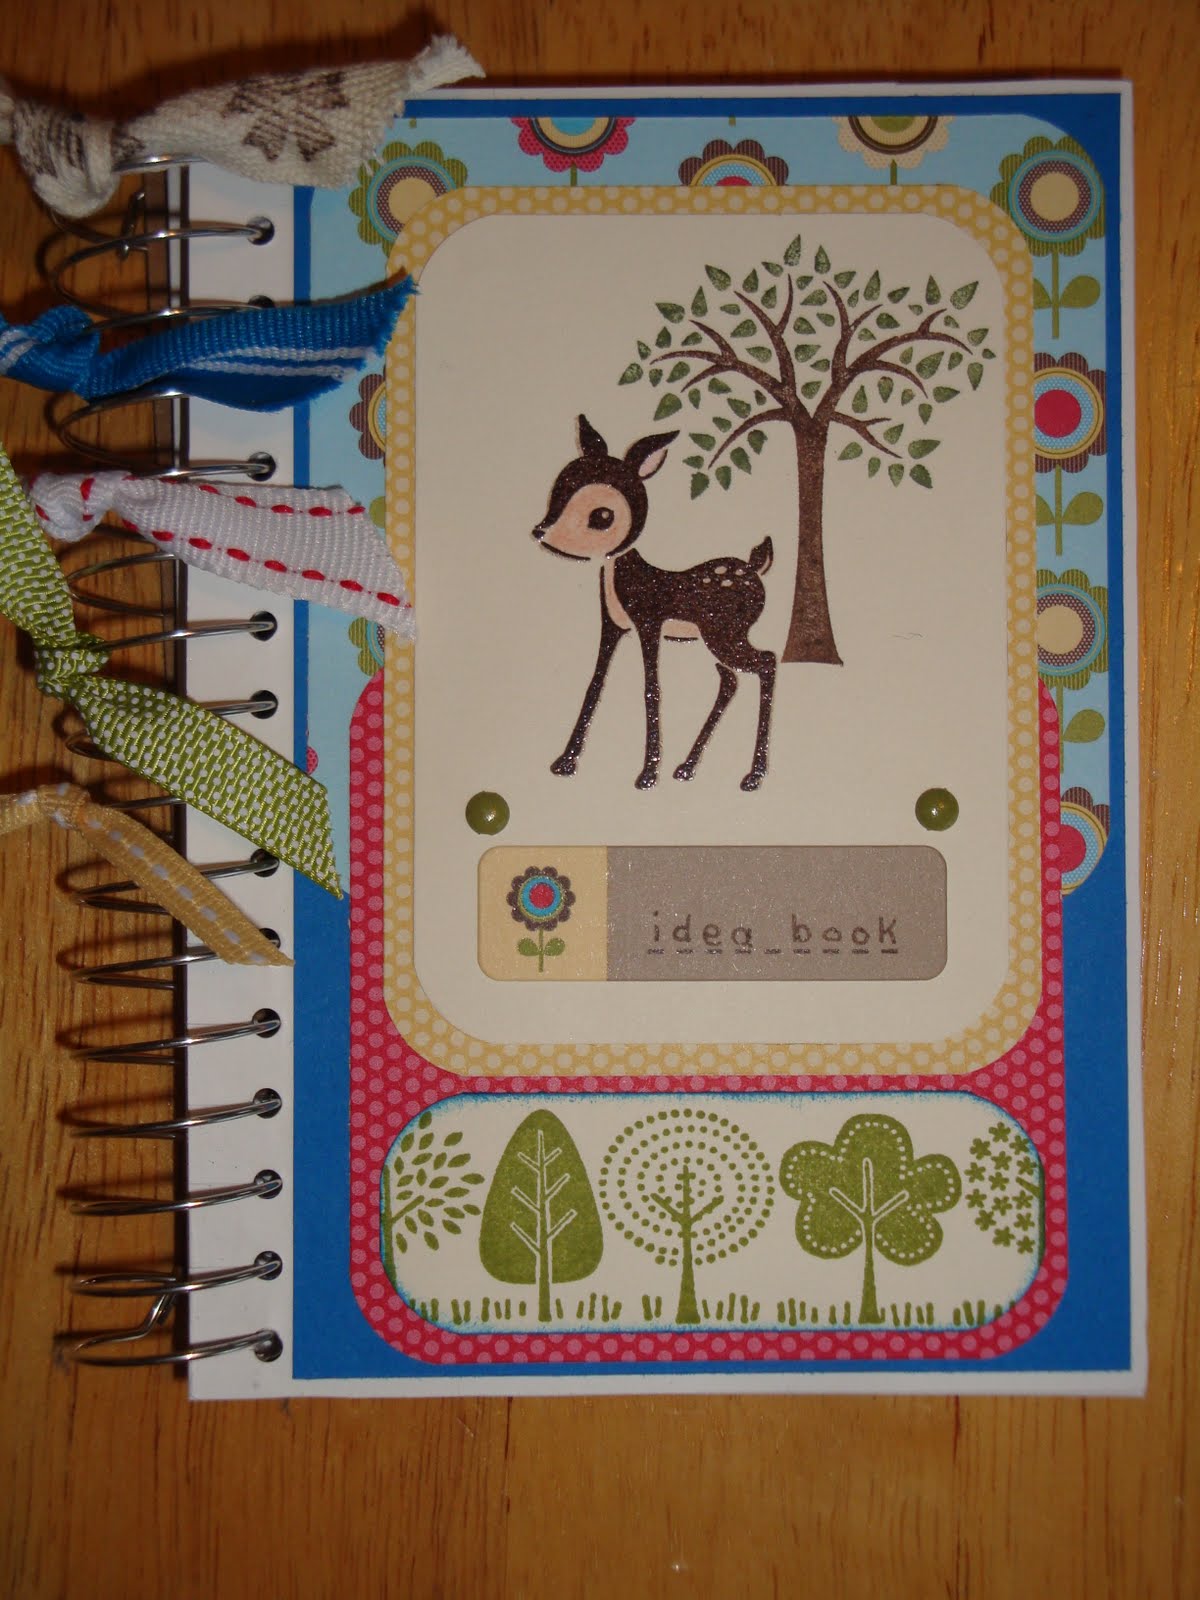
I saw an idea for recovering those small purse-size coil notebooks, and decided a full-size, hardcover notebook would make a fabulous teacher's gift! And I wanted to go ALL OUT! At first, I had grand visions in my head, including 3D flowers, glitter and tons of embellishments, but I realized it had to be able to lay flat when open, and stand up to being used and carried around, so I had to tone my vision down a notch... I think I managed to make it very textured and visually intense, without making it a useless decoration ;)


To re-cover the front, I used Very Vanilla Cardstock, and stamped the damask stamp from the Sale-A-Bration "Bliss" set over the whole page, alternating in Old Olive and Marina Mist. Then I turned it into faux linen with a gluestick and crumpled tissue paper. I used my Crop-a-Dile to align and punch the holes, and then snipped a slit at each hole, to be able to slide it through the rings. I didn't put it on or glue it down though, until the whole cover was finished.

Some close-ups...

I ran the Top Note die through my Big Shot, and then stamped this image from "Notably Ornate" in Versamark and Clear embossing powder. Once it was set, I sponged Old Olive over the whole diecut.

I used the First Edition DSP, and stamped these flowers from "Elements of Style" in black Staz-On ink. Then I used my Watercolor Pencils and Blender Pen to color them in, corner punched it, stuck a layer of Marina Mist behind it and distressed it. An Old Olive ribbon wrapped around it, with the bow glued down to keep things flat and portable, finished it off.

I did the "for you" with another stamp from "Elements of Style", the same way I did the one on the Top Note die, but I used Marina Mist ink for the sponging. Then I mounted it in some Styled Vanilla Hodgepodge Hardware, dded two tags, stamped and punched with the Tiny Tags collection, and Glue Dot-ted them down.

This is just a close look at the faux linen effect... oh, and when I was done, I gave a few sprays of Smooch Spritz to the whole thing for a bit of glimmer. Also, I added a place saver on the same Old Olive ribbon... just a chunk of chipboard, punched with the Crop-a-Dile, and stamped with another stamp from "Notably Ornate", and then distressed the edges with a metal file from the Distressing Kit.

The inside...

Just some Very Vanilla CS and a stamp from last summer's "First Day" set on the left, and a stamp on the pocket, from the "Office Accoutrements" set.

And the back...

This is what the front cover used to look like. I didn't bother covering it, because it works well. I wish I could have put my copyright stamp directly on the brown, but I had to cover the Staples logo ;)

Edited: It was pointed out to me that I forgot to post all the details ;)

PS: All products used are Stampin' Up! except for the generic tissue paper, white thread and chipboard. I've also entered this into the Stampin' Up! Only Challenge, which is wedding stationary... I think this fits the bill :)

Wednesday, June 22, 2011

Card Patterns Sketch 120

For another sister's birthday, I wanted something funky to suit her style, but other than black, I wasn't sure what colors she likes right now, so I asked her... she said BRIGHT white, and maybe some fuschia accents... I was SO excited to hear that, because I knew I could have tons of fun with this card! I found a sketch challenge to work with, and here's what I came up with... I am REALLY going to miss the Extreme Elements set when it retires next week :( I'll still have mine of course, but if you want a chance to grab this set, let me know before my class on Monday 27th!


Here's the sketch I used...


I used:

SU: - Melon Mambo and Whisper White CardStock
- Melon Mambo Designer Series Paper
- Extreme Elements stamp set
- Grunge Rock stamp set (for the Happy Birthday... another one I'm sad about it's retirement)
- Basic Black and Whisper White Craft Inks
- Clear embossing powder
- Pinking Hearts border punch and Corner punch
- Basic Black grosgrain ribbon, and Whisper White organza ribbon
- Large white grommet and Star brad

Random:
- Embossing folder for the base
- Pink glitter stuff for the ribbon ends

Monday, June 13, 2011

Card Patterns Sketch 119

I used this sketch to make a birthday card for my sister...


All products used are Stampin' Up! (except the generic white crochet thread)

- Pear Pizazz and Chocolate Chip CardStock
- Nursery Suite DSP
- Every Little Bit gift stamps, done in Chocolate Chip, Clear Embossed, and colored in with SU! Watercolor Pencils
- Take A Spin stamp for the game spinner, done in a tie-dye style with Pear Pizazz and Baja Breeze inks. Game Spinner hardware for the spinner, and the circle is glued only on the left, sot the doors can open
- 1/2" circle punch and pewter brads to make the folder closure for the center opening door

Here's the awesome sketch that inspired me...

Saturday, June 11, 2011

HSS Theme Challenge #70 and SSS-122 sketch challenge

It's a little early, and like the last card, not a lot of Stampin' Up! stuff, but my hubby's not a "tie" kind of guy, so this year's class card wasn't right for him... here's HIS kind of card :)


The base and layers are Marina Mist, Basic Black and Whisper White CS. The sentiment and DAD on the tag are Marina Mist ink on the Best Dad Ever stamp set. I used my 1/2" circle punch to punch the circles on the main image, and the flat stamp and charcoal distressing ink from my SU! Distressing Kit, to give a faux metal effect to the WW CS.

The Hand Stamped Sentiments theme was Masculine cards, and I think this fits the bill perfectly! The Sweet Stop sketch is:

Get Creative Challenge


The challenge here was simply to use 6 elements, but they all had to be the same element (ie. 6 brads, 6 flowers, etc.). I came up with this bright and fun card that's sure to please the 2 year old who's getting it tomorrow :) I have to admit, the only Stampin' Up! stuff is the cardstock, stamps, ribbon and brads, but it's just so fun! I can't wait till the July catalogue... I hear we're getting TONS of great stamps for kid's cards, including a construction set!!!

Friday, June 10, 2011

Mojo Monday 194 and Color Throwdown #145

I often look at the Mojo Monday sketch, and I did enter once, but wan't very happy with my entry. When I see the fabulous creations entered every week, especially some of the entries my upline, Andrea Munro has done, I feel intimidated by their sketches... but yesterday I decided to go all out, try to stretch my limits, and try some new techniques, to come up with a card worthy of competing in this challenge. So, here it is!


I knew right away that I wanted to do patchwork stitching with the stripes. I recently made another patchwork card that I loved, but it was for my inlaws anniversary, and it wasn't Stampin' Up! paper, so I can't keep it or display it on my board at classes. This one, I'm keeping for awhile ;)Like the other patchwork card I did, I also sanded the edges and the seams, to give it a more worn look.


Another technique I'd been wanting to try was sanding my stamped paper to give it a worn fabric sort of look.


Also, after seeing so many beautiful cards with Donna from ButterNut Sage Designs' Blown Glass technique, I challenged myself to try and figure it out myself... this is my first attempt, and while it's obviously not the same as hers, I really like it! I'll try a few more things, and see what I can come up with, before I buy her tutorial, simply because experimenting with possible "recipes" may help me come up with totally different techniques that I love, like this one :)


The challenges I used are:


Supplies used: (All SU! unless otherwise specified)

- Nursery Suite DSP, Pear Pizzaz and Whisper White CS
- Baja Breeze, So Saffron and Pear Pizzaz ink pads
- Pear Pizzaz and Marina Mist ink refills
- Crystal Effects and Smooch Spritz
- Glitter Glass
- The Bliss stamp set from Sale-a-Bration
- Rhinestones
- So Saffron grosgrain and Whisper White organza, dyed with my leftover ink/smooch concoction
- generic white crochet thread

Tools used: (All SU! unless otherwise specified)
- Mat Pack for piercing
- Sanding and filing tools from our Distressing Kit
- Blossom Bouquet Triple Layer Punch
- Fun Flowers Bigz Sizzix die (with Big Shot)
- random embossing folder

Thursday, June 9, 2011

June Workshop cards and CPS 221 challenge

First, here's a pretty Thank You card, great for a teacher, or anyone else...


I used:
- Marina Mist base
- Rose Red, Pink Pirouette and Perfect Plum for the flowers, punched with the new Triple Layer Blossom Bouquet punch
- Pear Pizzaz and Nursery Suite DSP, punched with the Spiral border punch, to create funky grass
- Pear Pizzaz seam binding ribbon for the stems and a Whisper White Organza bow
- Rhinestones and a Perfect Plum button
- Sentiment from Swirls and Curls Verses Hostess Set, in Whisper White and the flower colored in with a watercolor pencil


This one is a perfect "grad" card for preschool or kindergarten... or if that doesn't apply, the sentiment can be changed to "Happy Birthday!"

I used:
- Definitely Daffodil base
- Real Red CS and Tempting Turquoise DSP for the second layers
- Whisper White, with Hopscotch stamped in Tempting Turquoise
- Watercolor paper, stamped in Black Staz-On with this cute boy (there are 3 other kids to choose from as well, to suit your kid best). Then colored and accented with Watercolor Pencils and a Blender Pen. Edging and sentiment in Real Red.

I used a sketch for the layout of this one...

Wednesday, June 8, 2011

Tooth Fairy Card and TESC139 challenge

It is SO hard to make a Tooth Fairy card that doesn't look girly... and according to my hubby, I failed, lol! But I think a tooth fairy with gumboots and a wagon is as good as it's gonna get ;)

Ironically, Stampin' Up! has a great tooth fairy stamp, that's retiring this month, and I was going to order it next week, for just this occasion... but Wyatt's first loose tooth decided to beat me to the punch, so I had to find a digital stamp instead, import it to My Digital Studio, and print it onto Watercolor paper.

I used an "all boy" color scheme... Old Olive base, Chocolate Chip sidebar, Tempting Turquoise second layer (from last summer's Tropical Island DSP), and PlayDate stripe DSP for the skirt. This was my first attempt at small paper piecing, but I figured it out eventually. I reprinted my image on plain paper, and cut out the pieces of the dress, so I could trace them onto the DSP.

I colored the boots and hairbow in Always Artichoke, her hair in Chocolate Chip and used Blush Blossom Watercolor Crayon for her skin with Pretty in Pink for her cheeks. Some retired Old Olive ribbon, with Tempting Turquoise brads at the ends made the bar at the bottom.


And here's the sketch I followed...

Tuesday, June 7, 2011

CCMC153 Sketch Challenge

Another teacher Thank You card...


Based on this sketch...


I used textured Melon Mambo CS for the base, Certainly Celery for the second layers and Razzleberry Lemonade DSPs (except for the butterfly, which was the DSP Brights Stack). The stripes are embossed with the PPD folder, and the layer behind the flower is punched with the Pinking Hearts border punch. The Fun Flowers Bigz die created the many layers for the flower and an Ice Cream Parlor button on the center. A Beautiful Wings Embosslit butterfly and some Certainly Celery riboon finish off the bottom and the Sweet Little Sentiments stamp in Rich Razzleberry fit perfectly in the top corner. I had to move the square out of the sketched spot, since my flower was too big, but it looks so pretty in these prints, I couldn't bring myself to leave out the back layers to make it smaller. I hope CCMC can forgive me for using one teeny-tiny jewel that isn't Stampin' Up!, on this SU only challenge... my SU rhinestones are on the UPS truck right now, for afternoon delivery, and this one just fit so perfectly, and got it done before the sketch deadline closes ;)

Monday, June 6, 2011

Stamping 411 Saturday Sketch Challenge 206 and CCMC-SUM03 color challenge

My first of 2 Thank You cards for Dawson's preschool teachers, since school ends for him this week...


I used Wild Wasabi for the base, Pacific Point for the next layers, and Definitely Daffodil DSP for the patterned layer. I moved the border punch to my top layer instead, so it would be more visible and bring out the "school" theme better. I used the alphabet and number stamps from First Day, and repeated to the bottom without re-inking, so it would fade. Then I stamped and clear embossed the "thanks" from the Sale-A-Bration So Happy For You set. My embellishments are a Metal Edge Tag, stamped with another First Day stamp (done in Pear Pizzaz, because I don't have Wild Wasabi ink yet), and a Pacific Point striped grosgrain ribbon taken apart and tied in a bow, and a Sale-A-Bration button glue-dotted on. I tried to stitch it on, but it kept pulling at the threads of my bow and wrecking it.

Here are the sketches I used...


Sunday, June 5, 2011

Inkspirations Color Challenge #72 and Card Patterns Sketch 118

This one started with a cute idea, that I thought worked REALLY well with the sketch, and turned into a card with a few unfortunate mishaps... oh well, they can't all be perfect ;) And fortunately, I know the little boy who's receiving it won't mind the imperfections at all!

Here's the sketch (which I LOVE, by the way!... very unique!)


And the colors


Things I like:

1. The freehanded Right On Track roller to create the hill
2. The sponged Pear Pizzaz to fill it in
3. Using the sun as a place to put the mini sentiment

Unfortunate mishaps:
1. The embossing powder on the tracks didn't stick to most of it
2. After gluing everything down, I realized I didn't trim the peach layer behind the white well enough
3. The Not Quite Navy smudges my fingers left all over, AFTER it was finished
4. The fact that the tracks show through my Choo Choo train... okay, that was just a serious design flaw, not a mishap ;) I know I could fix that by stamping them on fresh paper, cutting them out and layering them on top, but tiny precise cutting is NOT my forte, and I don't want to spend this entire sunny day inside trying, lol!

I think I'll just try one more card today, and if I mess up again, I'll declare this an "off" day and go play outside :)


Things I don't like

Thursday, June 2, 2011

Inkspirations Sketch Challenge #71 and Hand Stamped Sentiments Technique challenge #69

This card was time consuming, but SO worth it! First I figured out the measurements for my patchwork pieces, and then stuck them to Whisper White CS. I sanded the edges of the whole new piece, and then used the widest metal file from the SU distressing kit, to rough up the joins between the patches and add some "worn" spots in the seams. I used my mat pack to pierce along all the seams, and then stitched the whole card up and stuck it onto my Crumb Cake base. I don't have any Anniversary sentiments yet, so I used this sweet little one from the Sweet Little Sentiments in Chocolate Chip, and the scallop heart from Framed with Love, and punched it with the Whole Heart punch. A coordinating bow finished it off.


Here's the sketch that inspired me...